Mllt1 - Paul Stretch
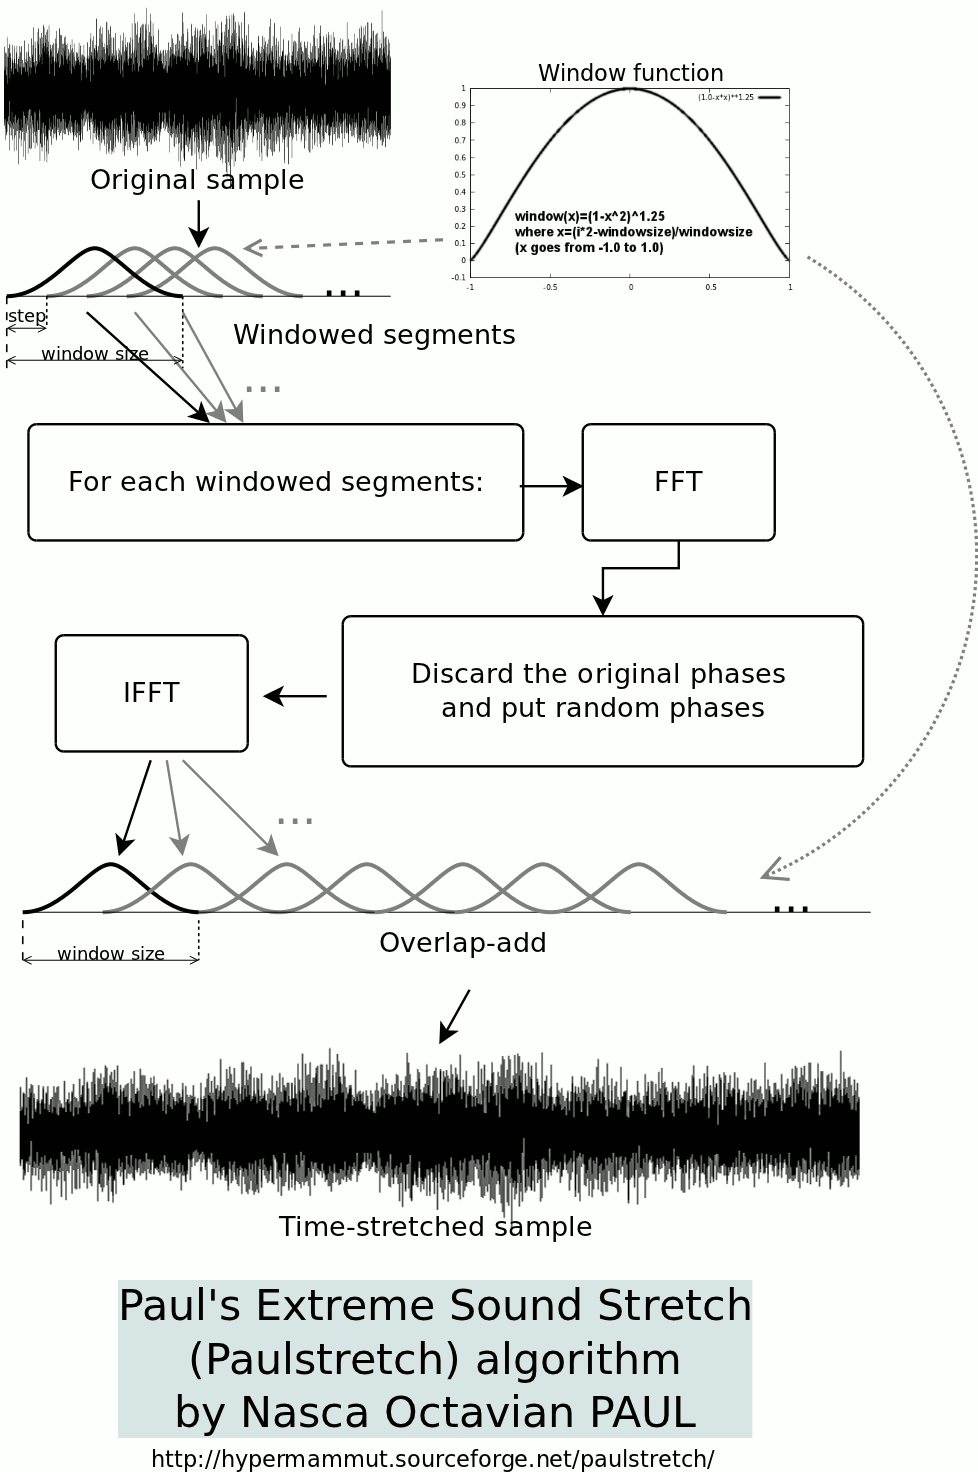
This tutorial shows you how to develop a basic workspace in Mellite. We will be writing a non-realtime signal processing program ( FScape ) and wire it up with a simple user interface ( Widget ). We use as example the Paul Stretch algorithm, named after its creator Nasca Octavian Paul and originally a standalone software to perform “extreme” time stretching of sounds and additional spectral transformations. Paul has since released a public domain version of the stripped down stretching algorithm written in Python. The idea is very simple but remarkably effective: An input sound is stretched by taking “segments” (windows) overlapping in time, calculating their spectra (Fourier transform), randomising the phase information, resynthesising the time domains segments and putting them back together with an “overlap-add” operation, using a larger stepping size than in the analysis. This is illustrated in the following diagram provided by Paul:
This tutorial is structured as follows:
- First, we give a from-scratch introduction on how to get started in Mellite, how to create and populate a workspace. If you are already familiar with these, you can skip this section.
- Next, we’ll run an example to understand how to compile and render FScape programs.
- Then we learn how to import audio files into a workspace.
- The fourth section develops an intuition about transforming an audio file with FScape.
- The fifth and last section actually implements the Paul-Stretch algorithm.
- At the end, you find a download link for a ready-to-use workspace.
Creating a New Workspace
Assuming that you have downloaded and launched Mellite, the first thing to do is create a new workspace.
A workspace in Mellite is the document that contains all objects belonging to a project. Technically, a workspace is a database on the file system, taking the form of a directory ending in .mllt by convention. You can think of the workspace as a PD or Max project, for example their main patch and the related abstractions, or as a SuperCollider .scd document. In contrast to PD, Max, and SuperCollider, manipulations in a workspace are always performed directly on the database, so there is no “unsaved” document state and no explicit save operation.
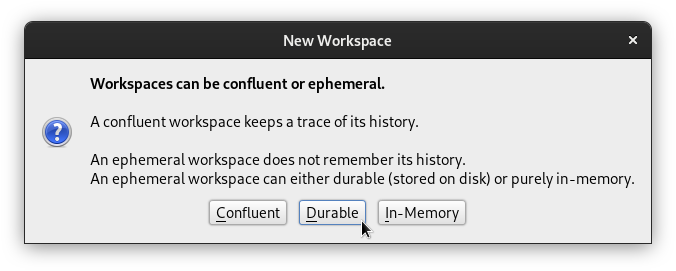
To create a new workspace, choose File → New → Workspace… from the main window’s menu, and in the subsequent dialog select the default option Durable, after which you are prompted to choose the name and location of the workspace on your file system:
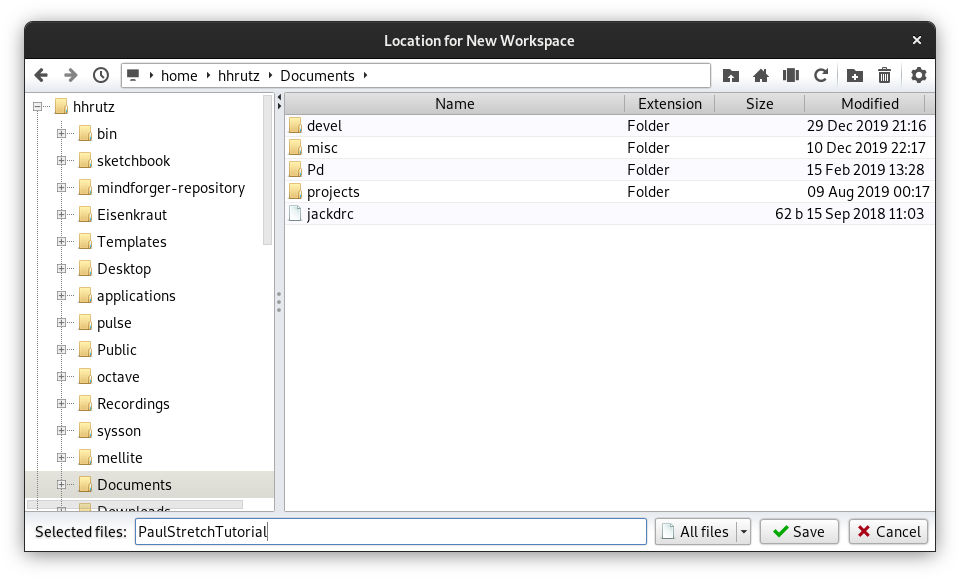
For example, we could name the workspace PaulStretchTutorial and save it inside the documents directory in your home directory.
Because all operations are performed on the file system, choosing a location on an SSD is preferable over a traditional hard disk.
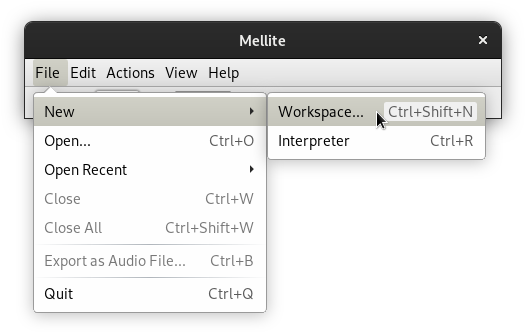
The window you see now is called the workspace root window. It represents the top element of a workspace, a so-called Folder. A folder is simply a list of elements, and you can nest folders inside folders to obtain a tree-like structure. You can think of a folder as a PD or Max patch, only that objects have no visual position within the patch but are just itemised as a list. Since we just created a new workspace, that list is still empty. Add a new object by clicking on the button with plus-shaped icon and choosing from the popup menu Composition → FScape:
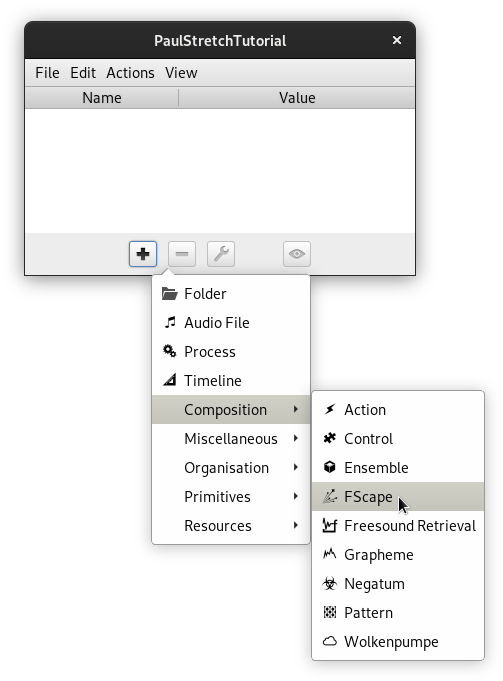
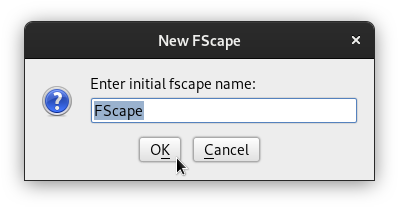
A prompt for a name for the new object will be shown. This is like naming a variable—since you may have multiple FScape programs, you distinguish them by name. Let’s just use the default name “FScape” for now, and confirm the dialog:
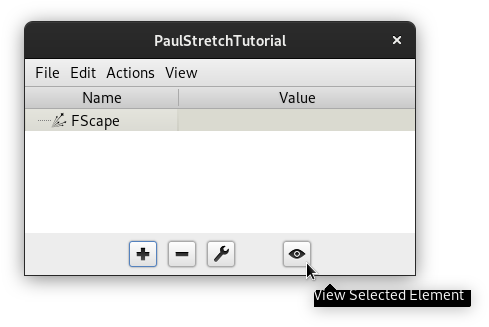
You now see a new object in the workspace root window. It is an empty program, and in order to write our signal processing code, we have to select it with the mouse or cursor keys and click on the button with the eye-shaped icon to open its editor:
Giving FScape a Spin
The code editor in Mellite is provided by a light-weight component modelled loosely after the popular IntelliJ IDEA software—much less powerful, but sharing some of its visual cues and keyboard shortcuts.
If you are new to this editor, it is advised that you take a look at the keyboard shortcuts, which can be found in the menu Help → Keyboard Shortcuts in Mellite’s main window.
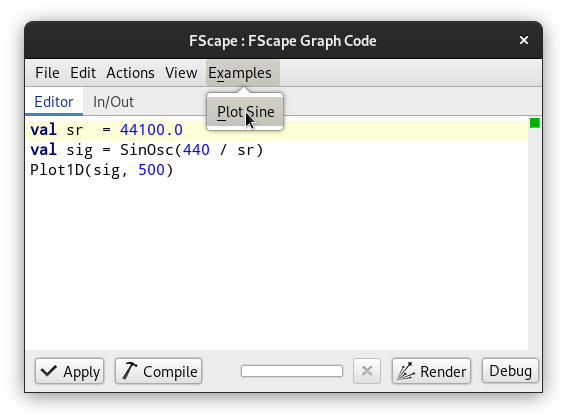
Before we type any code ourselves, we begin by using a built-in example of an FScape program. It generates and plots a sine wave. To get the code of this example, select the Examples → Plot Sine menu item:
Like all code in Mellite, it is written in the Scala programming language, although we use different domain specific abstractions depending on the type of object. Here we use the signal processing toolkit FScape with its own set of available elements and rules. For example, as opposed to a “fully fledged” Scala program, we can write FScape code here directly on the “top level” without wrapping it inside an object or class, and also we do not need import statements for the commonly used symbols.
As we go through the code, there will be extra boxes explaining bits of the Scala language to you. If you are already familiar with Scala, you can simply skip these boxes. Here is that example code again in text form:
val sr  = 44100.0
val sig = SinOsc(440 / sr)
Plot1D(sig, 500)
You can place a statement in each line without having to use a terminal character such as ;. You only need a semicolon if you want to place multiple statements in the same line. Values and expressions can be assigned to variables in the form of val name = expression. Conventionally, you would use “camel-case” names for variables, beginning with a lower-case character.
Since FScape calculates “as fast as possible” without being tied to real-time sound output, there is no given sampling rate, the number of digital samples per second in the sound signal. If a program generates sound “from scratch”, you would normally define a suitable sampling rate, or if a program transforms an input audio file, you would normally use that audio file’s existing sampling rate. Common sampling rates are 44.1 kHz (44100 Hz) and 48 kHz (48000 Hz). The first line val sr = 44100.0 defines a variable for the sampling rate that we can then use subsequently.
The second line val sig = SinOsc(440 / sr) creates a so-called unit generator (UGen), in this case a sine oscillator. Whereas in real-time systems, you typically specify its frequency in Hertz, for example using [osc~ 440] in PD, [cycle~ 440] in Max, or SinOsc.ar(440) in SuperCollider, in FScape you give the normalized frequency, which means that you divide the nominal frequency in Hertz by the sampling rate—precisely, because FScape does not know what the sampling rate is. For the same reason, there is no distinction between audio-rate and control-rate as in SuperCollider.
The third line Plot1D(sig, 500) introduces a unit generator that plots the first 500 values of the sine oscillator when the program is run.
Plot1D is really just a tool for debugging, as it currently blocks the further execution of the program. In the future, visualisations will be much better integrated into FScape.
To run this program, we need to understand the buttons at the bottom of the editor window, namely Apply, Compile, and Render. Code snippets in Mellite exists always in two forms: Source code and compiled graph. Furthermore, when you edit code in the text editor, the changes only exist in a temporary buffer and have to be explicitly applied, as if the updated source code was “saved”. Thus if you tried to close the editor window now, you would see a dialog warning you that you have “unsaved” changes. The Compile button can be used to test whether the current buffer (editor content) is a valid program. When you click that button, it should take a moment to compile and return with either a green mark (program is valid) or a red mark (errors). In the case of errors, these are also printed to the log window. You rarely need to use the Compile button, because the editor automatically test-compiles your code in the background as you edit, indicating the state on the right-hand side of the window. The tiny green square in the screenshot above indicates that the program is valid. If you introduce errors, these will be indicated by red marks. For example, if we left out the second argument of Plot1D and just wrote Plot1D(sig), we would see a compilation error:
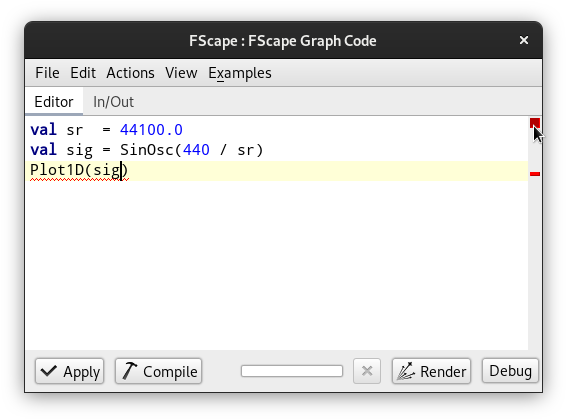
The error reads something like
error: not enough arguments for method apply: (in: GE, size: GE, label: String)Plot1D in object Plot1D
We can undo the last edit using ctrl-Z (Mac: cmd-Z). If the program is valid, we can save both source code and the compiled graph by clicking on the Apply button. When this button is disabled (shown in faint colours), it means the current buffer has been saved.
Sometimes the Apply button is not shown disabled even after saving.
It is currently not possible to save just the source code if the program is invalid. This will be fixed in a future version. As a work-around, you can place a block comment /* ... */ around your code to be able to save and exit the editor while your program is still invalid (the compiled graph will be empty in this case).
Finally, to run the program, we press the Render button. It is important to understand that this will run the last saved compiled graph, so if you forgot to save you might be actually running a previously saved version, not the one corresponding to the current buffer! The output should be the plot window showing the first 500 sample values of the sine oscillator:
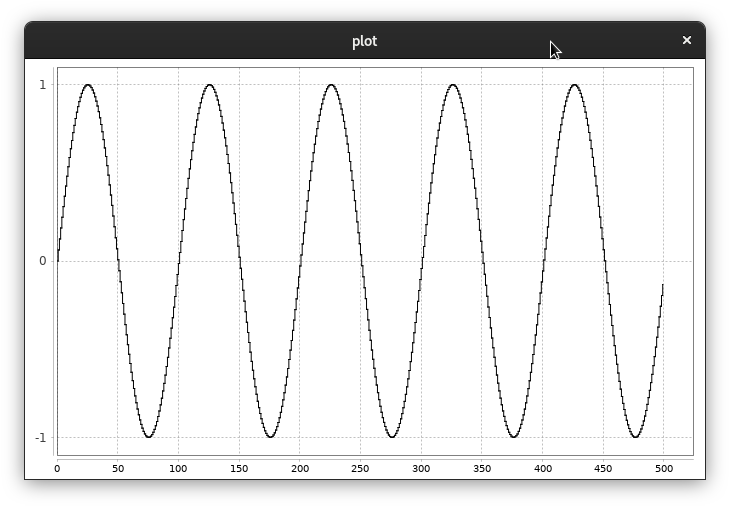
As you can see, the signal range is between -1.0 and +1.0, corresponding with the approach of most other signal processing software, including PD, Max, and SuperCollider.
Adding an Audio File to the Workspace
The next thing we want to do, is add an audio file to the workspace that we can use as input for our FScape program-to-be. Here is a two seconds bell-like sound placed in the public domain:
You can right-click on the sound player element in the browser and select Save Audio As in the popup menu to obtain a local copy of this sound. Note that the file format is uncompressed WAV!
While Mellite can export compressed formats such as mp3, it currently only handles uncompressed or “PCM” formats as input, typically AIFF or WAV files. If you have mp3, FLAC or Ogg files, you must convert them to be able to use them in Mellite.
The easiest way to get the input audio file, is to add it first to the workspace root folder, and from there make the connection to the attribute map. Therefore, go back to the workspace root window, press the plus button again, and this time select Audio File. A file chooser opens, navigate to the WAV file downloaded, select it and press Open. A second file chooser opens, prompting you:
Choose Artifact Base Location
Because this is the first “external resource” you add to the workspace, Mellite wants to know what your base directory for audio files is. Every audio file you add is relative to one of these locations (directories). Just stick to the default suggestion here by simply confirming with Open again. Two new elements should have been added now to your workspace folder, the location and the audio file itself:

If you select the audio file and press the eye button, a viewer opens with the sonogram of the sound and a transport bar to play back the sound:
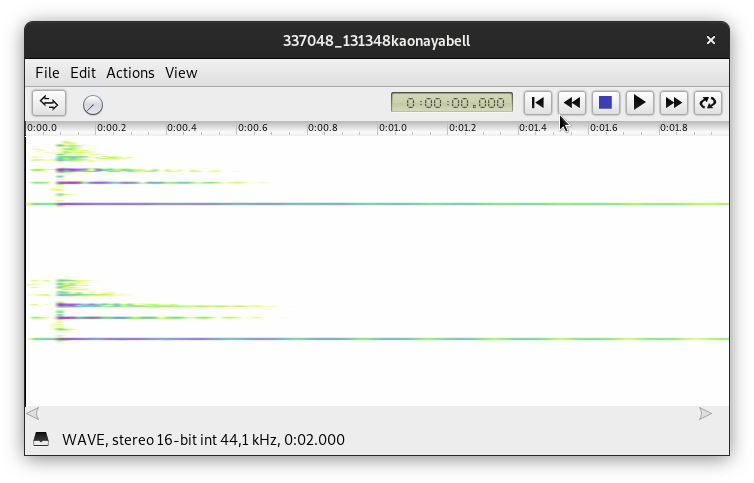
Before you can hear the sound when pressing the play-button, the audio system must be started, by pressing the Boot button in Mellite’s main window. If you haven’t done yet, you must make sure that SuperCollider is configured in the preferences, as every real-time sound production goes through SuperCollider. In Mellite’s preferences, select the Audio tab, and edit the SuperCollider (scsynth) setting if necessary. On Linux, it can usually remain on the default scynth or scsynth.exe program. Once you manage to boot the audio system and press the play button in the audio file viewer, you should hear the playback and see the output meter moving in the main window:

Reading and Writing Audio Files in FScape
Let us now return to the FScape code editor. We are going to write the first program that transforms an existing audio file. The program will begin with a UGen that reads the existing (input) audio file, and it will end with a UGen that writes a new (output) audio file. The transform consists of a “normalization”, i.e. we apply the maximum gain so that the signal range does not exceed -1.0 to +1.0, making the signal maximally loud while avoiding digital clipping. In the first step, let’s measure the maximum amplitude of the input signal:
val in        = AudioFileIn("in")
val chanMax   = RunningMax(in.abs).last
chanMax .poll("chan-max")   // print the amplitude of each channel
val totalMax  = Reduce.max(chanMax)
totalMax.poll("total-max")  // print the maximum input amplitude
Before we can run the program, we must provide the input audio file location. Note how AudioFileIn uses a string parameter—"in"—to refer to this location. This is a key into the attribute map of the FScape object, where the actual file location will be looked up when running the program. This way, we avoid having to hard-code file paths in the program, and later we can link this key to a user interface component as well.
String literals in Scala have to be enclosed in double quotes "...", just as in Java or SuperCollider. Another similarity are line comments which begin with double forward slashes // .... Comments are purely informative to the reader, they are ignored by the compiler.
We can freely choose the key, but we must be careful that a corresponding entry actually exist. For example, if we save and run (render) the above program, there will be an error:
java.lang.RuntimeException: AudioFileIn missing attribute in
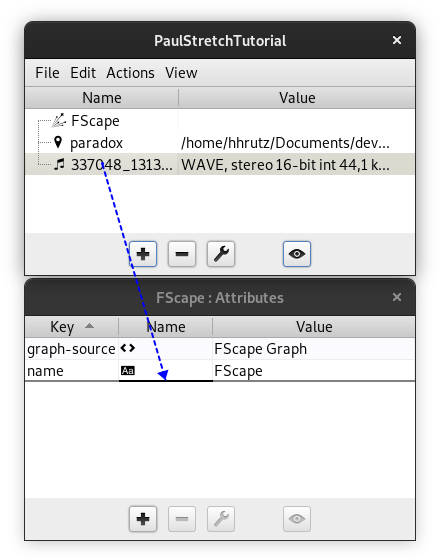
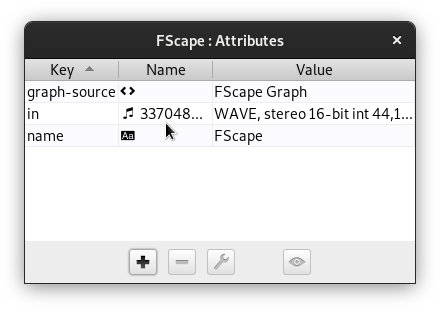
To create the necessary entry, we first open the attribute map of the FScape object. Go back to the workspace root window, select the FScape object in the list and click on the button with the wrench-shaped icon to open the corresponding attribute map.
In Mellite, every object possesses an attribute map, as a way to specify its behaviour and make links between different objects. Some attributes have predefined meanings, for example "name" points to the given name of an object. Other attributes are defined by the user, with their keys being freely chosen.
We had already added the test audio file to the workspace, and now we need to associate it with the "in" key of the FScape attribute map: Press on the audio file entry in the workspace root window, keep the button pressed and move the mouse over the attribute map view, finding a position at the bottom of a row. You should see the mouse pointer change to a drag-and-drop pointer, and a thick line on the attribute map view indicates the drop position. Release the mouse button. A dialog pops up to specify the key name. Enter in and confirm. The new entry appears next to the existing entries for name and graph-source (this is where the source code of the FScape program is located):
I am aware of the ergonomic challenge in this drag-and-drop operation. In the future, it is planned to make this association gesture easier, both in terms of mouse usage, but also adding keyboard equivalents. If you have any suggestions how to increase the usability, please let me know.
Now try clicking Render again. The program should run, and output the individual channel amplitudes and the overall amplitude to the log window:
chan-max: 0.26682332158088684
chan-max: 0.22031311690807343
total-max: 0.26682332158088684
Let’s analyse the code in more depth:
val in        = AudioFileIn("in")
val chanMax   = RunningMax(in.abs).last
chanMax .poll("chan-max")   // print the amplitude of each channel
val totalMax  = Reduce.max(chanMax)
totalMax.poll("total-max")  // print the maximum input amplitude
The first UGen should be clear now—it reads in an audio file by looking at the entry with key "in" in the containing object’s attribute map, expecting to find an audio file object there. The second line is actually comprised of three UGens: in.abs creates a UnaryOp UGen which operates on a sample-by-sample level, applying a particular operator, here the abs function that takes away the sign of each sample value, so an input sequence of -0.1, 0.3, 0.5, -0.4 would become 0.1, 0.3, 0.5, 0.4. This is because we are looking for the largest sample value to either side of the oscillation, above zero or below zero. The absolute values are then fed into the RunningMax UGen, which simply remembers the largest value it has ever seen up and until any moment in time, so if the input sequence was 0.1, 0.3, 0.5, 0.4, it would output 0.1, 0.3, 0.5, 0.5.
The result of this fed into .last which is shorthand for .takeRight(1). The TakeRight UGen drops all input sample values except for the last ones. This is an important difference to the real-time signal processing in SuperCollider, for example. In FScape, signals can have finite durations, and UGens do not have to output the same number of values as they take as their inputs. It is easier to view signals in FScape as if they were collections of numbers, on which one can perform typical collection operations such as truncating the sequence, sorting or reversing it, etc. This has some consequences for the design of programs to avoid that the signal flow “gets stuck”, as we shall see soon.
In short, the second line computes that maximum absolute value of the input signal. The third line calls the .poll function which produces as a Poll UGen that prints values from its input signals to the post window. As we do not specify a frequency of polling, it only prints a single time, that is the first value of the input signal. The string argument "chan-max" is a label, so that we can distinguish the output of multiple Poll instances. Because chanMax has already been truncated to a single value—the last element of the RunningMax UGen—we effectively print out the maximum amplitude across the entire input audio file.
But there is more to it as you can see from the output: With the given test audio file, we see two values printed, 0.2668 and 0.2203. This is because in FScape, signals can be comprised of more than one channel. In fact, FScape uses the same principle of multi-channel expansion as SuperCollider. Internally, whenever a signal contains more than one channel, the signal process just passes each channel through its own copy of the UGens in the program, so in our case there will be two .abs UGens, two RunningMax UGens, two .last UGens, and two .poll("chanMax") UGens!
When normalizing an audio file, we usually want to adjust the gain of all channels by the same value, otherwise we would alter the spatial balance between the channels. We therefore need a way to ensure that a multi-channel signal is reduced to a single-channel signal. This is precisely what the Reduce UGen does. It comes in several variants, such as Reduce.+, Reduce.min, Reduce.max, specifying how values across channels are combined. As you can see, Reduce.max took the maximum of the two channels 0.2668 and 0.2203, and output a single value 0.2668—the higher of the two amplitudes.
Now that we know the maximum amplitude, we can complete the program by calculating the normalising gain factor and writing the output audio file:
val in = AudioFileIn("in")
val chanMax = RunningMax(in.abs).last
val totalMax = Reduce.max(chanMax)
val gain = 1.0 / totalMax
val sig = in * gain
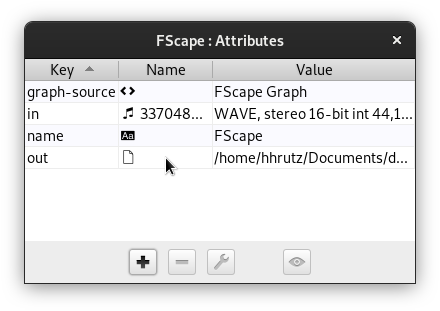
AudioFileOut("out", sig, sampleRate = in.sampleRate)
The gain factor is simply the reciprocal of the maximum amplitude found in the input. So 1.0 / 0.2668 ≈ 3.7477, and if all input sample values are multiplied by that factor, the maximum output amplitude is thus 0.2668 * 3.7477 ≈ 1.0. You can also see that we can multiply a multi-channel signal (in) with a single-channel signal (gain). Again, this works like multi-channel-expansion in SuperCollider: The result will have the maximum number of channel found (here two), and in the BinaryOp—the UGen produced by the * operator—the first and only channel of gain is used for both channels of in. Finally, writing the output file looks similar to reading the input file; we specify again a key, now "out", for the UGen to look up the file reference in the attribute map; the second argument is the signal to be written, and there are additional arguments for the audio file format, which we left at the default (the file will have AIFF format and 32-bit floating point sample resolution) except for the sampleRate. We use in.sampleRate to make the output file match the input file’s sampling rate.
You can see all arguments to AudioFileOut by searching for this symbol in the API documentation browser (menu Help → API Documentation). From the alternatives choose package de.sciss.fscape.lucre.graph. In Scala, methods and class constructors can use default arguments, and here they are given for fileType, sampleFormat, and sampleRate. To skip parameters in the use site, we can name the arguments, such as sampleRate = ... which means that the first two argument values, "out" and sig, are aligned with the first two arguments of the class, key and in, and then we “jump” to the fifth argument sampleRate. It is good style to use named arguments also in cases where you do not jump across arguments but just want to make clear which argument is which.
The creation of the entry for "out" is slightly different because this time the audio file does not exist yet. The object needed here is internally called Artifact, and in the Mellite user interface simply File. Let’s create it directly within the attribute map editor for the FScape object. Click the plus button and from the popup menu select Resources → File. In the dialog you can either type the file path directly into the Value text field, e.g. /home/foo/Documents/normalized.aif, or press the ellipsis button ... to select from a file chooser. After confirming, you need to give the key name, thus out.
If we now render the new program, we will see… exactly nothing. The Render button just remains disabled, the abort-rendering button with the x-shaped icon remains enabled. The program is stuck. Unfortunately, in the current architecture it is quite easy to accidentally produce programs that hang, which is due to the fact that there are “diamond problems” in the code. A diamond problem happens when a UGen A is used by two different signal branches B and C, and then a UGen D in turn uses both B and C. This works only as long as branches B and C use the same processing throughput, but as soon as for example B introduces a delay, we get into trouble. It is beyond this tutorial, but if you press the Debug button and look at the DOT graph which is printed to the log window, you may spot this problem:
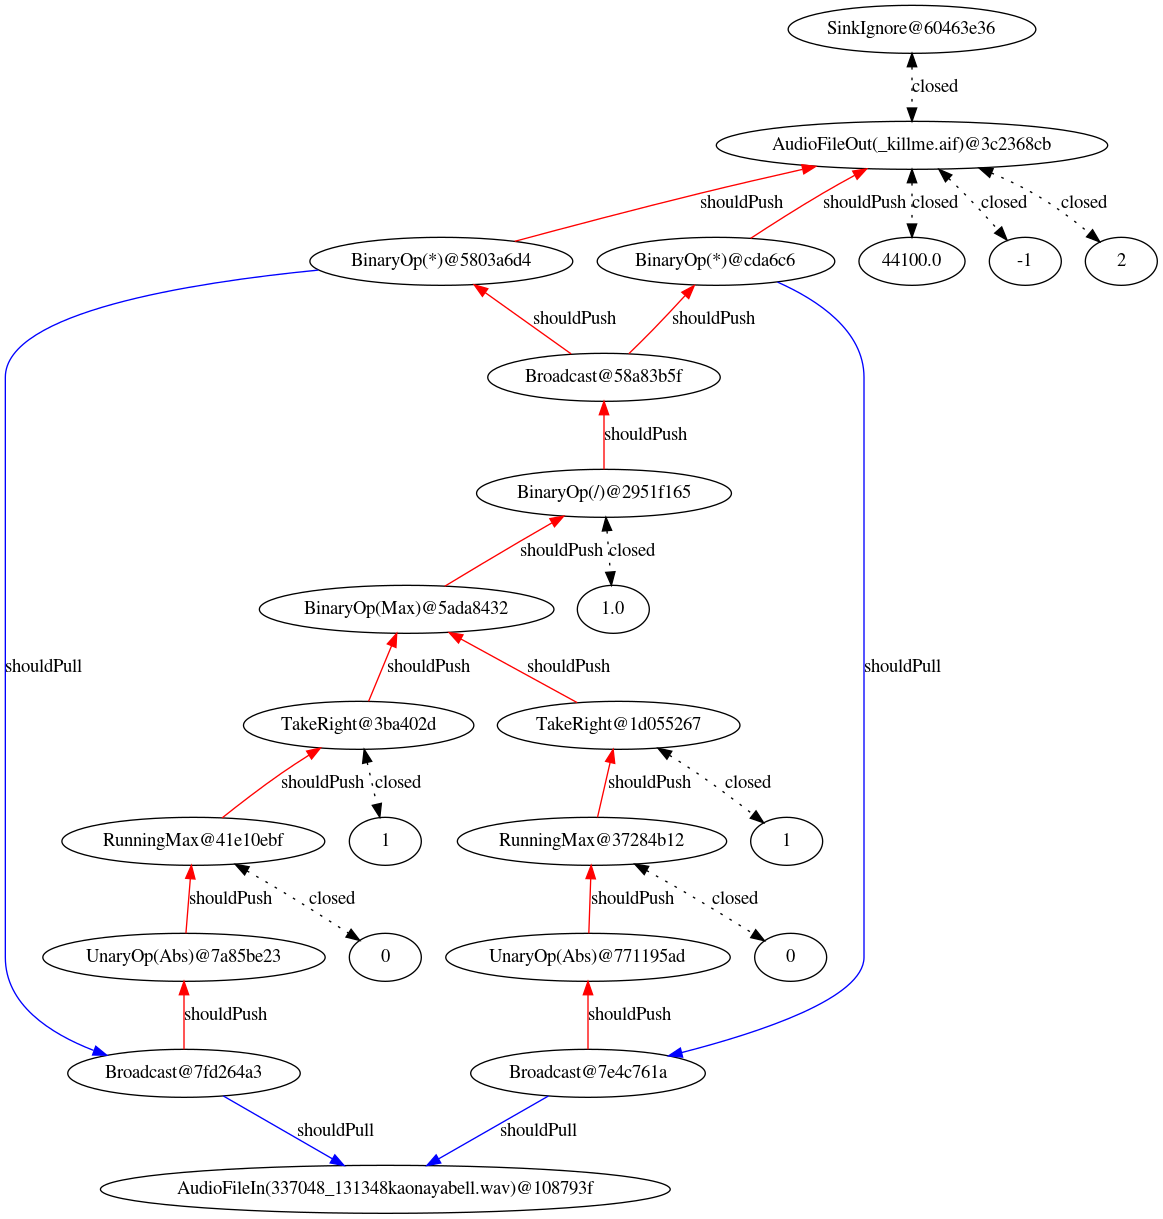
Note that the duplicate inner branches show the automatic stereo expansion, but are not the cause of the problem. The two nodes of the diamond problem are AudioFileIn on one end, and the multiplication BinaryOp on the other end; in short, the line val sig = in * gain causes the hanging, because gain is only available after the entire signal in has been read—obviously, because we only know the maximum amplitude at the very end!—but the multiplication would require that we can both scan in from the beginning and have gain immediately available. This is technically impossible, unless there was some magical automatic buffering happening.
FScape is still considered experimental in many respects. One of the aspects that should be addressed in the future, is to at least automatically detect these diamond problems and give the user help resolving them. As of now, the best you can do when you run into these problems, is to ask on the Gitter channel.
To fix this we could either:
- Introduce an auxiliary buffer,
val sig = BufferDisk(in) * gain. This creates an arbitrary long buffer for theinsignal by writing it to a temporary file. - Since the file is already on disk, we could just read it again:
val sig = AudioFileIn("in") * gain. In the DOT diagram above, the consequence would be that the blue “shouldPull” lines down from theBinaryOp(*)s are removed, as they are now connected to an independent duplicate ofAudioFileIn. - A variant of the second idea is to change
val intodef in, which means that whenever we refer toin, we create a freshAudioFileInUGen.
So the fixed program becomes
def in        = AudioFileIn("in")  // using def now!
val chanMax   = RunningMax(in.abs).last
val totalMax  = Reduce.max(chanMax)
val gain      = 1.0 / totalMax
val sig       = in * gain
AudioFileOut("out", sig, sampleRate = in.sampleRate)
Now in is called three times, first when calculating the amplitude, next when calculating the normalized signal, and a third time when querying the sampling rate in.sampleRate. The last call is inexpensive, however, as it does not stream the whole signal but just retrieves the audio file header.
While val a = b means that the right-hand-side expression b is evaluated once and the result assigned to a, the method definition def a = b means that whenever we refer to a, the expression b is evaluated anew. If b is a constant, there is no difference between val a and def a, however in FScape, expressions such as AudioFileIn(...) place the UGen in the signal graph, so if we evaluate that expression twice, we actually create two independent instances of the UGen.
PaulStretch in FScape
After this long haul, let’s look at the entire program first—before taking it apart and explaining the steps—so you can already experiment with it and render an actual sound:
val in          = AudioFileIn("in")
val winSizeSec  = 1.0 // window size in seconds
val stretch     = 8.0 // stretch factor
val N           = 4   // output window overlap
val sr          = in.sampleRate
val numFramesIn = in.numFrames

val winSize     = (winSizeSec * sr).roundTo(1).toInt.max(1)
val stepSizeOut = (winSize.toDouble / N).roundTo(1).toInt.max(1)
val stepSizeIn  = (winSize / (N * stretch)).roundTo(1).toInt.max(1)
val numStepsIn  = (numFramesIn.toDouble / stepSizeIn).ceil.toInt
val numFramesOut= (numStepsIn - 1).max(0) * stepSizeOut + winSize
val slidIn      = Sliding(in, size = winSize, step = stepSizeIn)
val winAna      = GenWindow(winSize, shape = GenWindow.Hann)
val inW         = slidIn * winAna
val fftSize     = winSize.nextPowerOfTwo
val fft         = Real1FFT(inW, winSize, padding = fftSize - winSize)
val mag         = fft.complex.mag
val phase       = WhiteNoise(math.Pi)
val real        = mag * phase.cos
val imag        = mag * phase.sin
val rand        = real zip imag
val ifft        = Real1IFFT(rand, fftSize)
val slidOut     = ResizeWindow(ifft, fftSize, stop = winSize - fftSize)
val winSyn      = GenWindow(winSize, shape = GenWindow.Hann)
val outW        = slidOut * winSyn
val lap         = OverlapAdd(outW, size = winSize, step = stepSizeOut)
val lapTrim     = lap.take(numFramesOut)
val maxAmp      = RunningMax(Reduce.max(lapTrim.abs)).last
val gain        = 1.0 / maxAmp
val norm        = BufferDisk(lapTrim) * gain
AudioFileOut("out", norm, sampleRate = sr)
If you run this with the example bell audio file, the result should sound like this:
For a better understanding, refer back to the diagrammatic algorithm scheme at the beginning of the tutorial—it more or less directly translates into this code. First, we select the two crucial parameters, the window size in seconds, winSizeSec, and the stretch factor. We can convert durations in seconds into durations in sample-frames—the unit that most UGens will work with—by multiplying with the sampling rate: val winSize = (winSizeSec * sr).roundTo(1).toInt.max(1). The last three operations ensure that we end up with an integer number of sample-frames, and irrespective of the parameters chosen, the window size will never be smaller than one.
FScape usually uses a stream of 64-bit floating point numbers for its signals, similar how to audio signals in PD, Max, or SuperCollider are represented. But unlike these other software, UGens may also use integer numbers when it makes sense, for example when applying a sliding window over an input signal, the window size and stepping size have to be integer signals. So often, we do need to convert double (floating point) signals to integer signals using toInt, which would truncate the numbers. In order to round decimals numbers up or down, we use roundTo(1) (“round to multiples of one”) first.
The parameter N relates to the step parameter in the diagram. I found that 4 works good with most sounds, it means that the window overlap in the reconstruction step (overlap-add) is 4 or 75% (the stepping size is 1/4 of the window size). More precisely, that stepping size is given by val stepSizeOut = (winSize.toDouble / N).roundTo(1).toInt.max(1). In order to obtain the stretching effect, we now use a much smaller stepping size in the analysis phase: val stepSizeIn = (winSize / (N * stretch)).roundTo(1).toInt.max(1). So with N = 4 and stretch = 8.0, each step in the analysis stage is 1/32 of the window size. The following image illustrates the process:
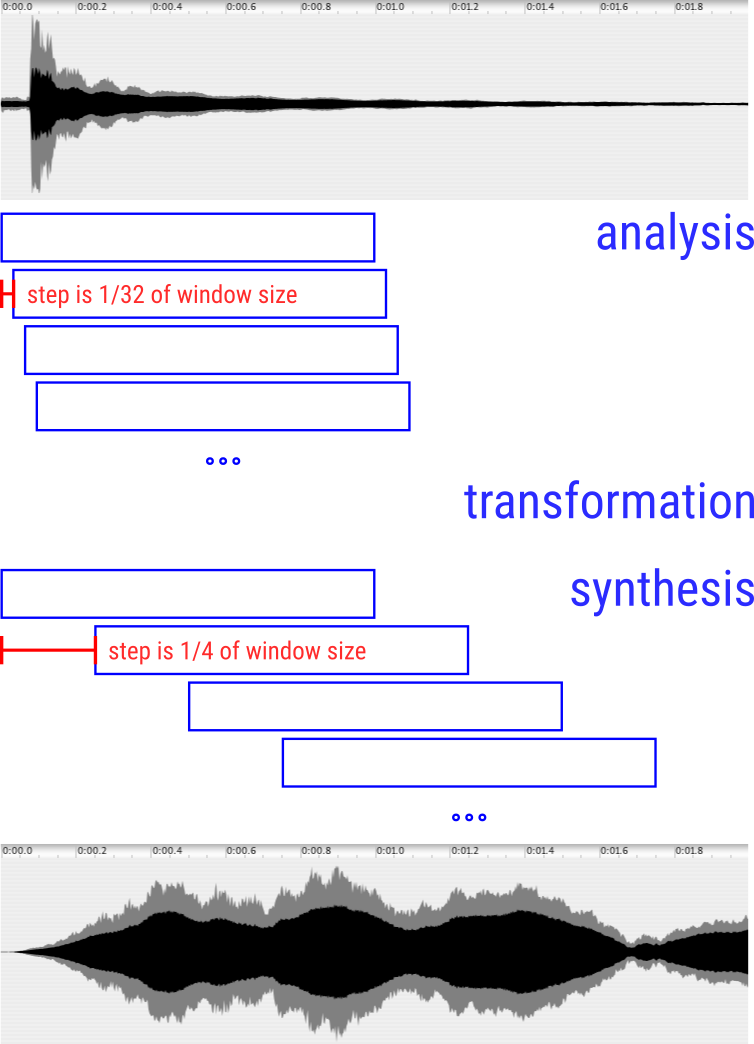
The analysis segments are obtained by the Sliding UGens—it produces a signal where each analysis window follows another—and the synthesis uses the OverlapAdd UGen which takes the subsequent windows, overlaps and sums them.
If numFramesIn = in.numFrames is the number of sample-frames in the input audio file, we obtain the number of windows by dividing it by the step size and rounding up (.ceil) to the next integer number: val numStepsIn = (numFramesIn / stepSizeIn).ceil.toInt. And consequently the output will consist of numStepsIn - 1 partial (overlapping) segments of stepSizeOut and a final full window of winSize: val numFramesOut= (numStepsIn - 1).max(0) * stepSizeOut + winSize. We need to calculate this length because we use infinitely long generator UGens, such as the window function generator GenWindow, and at some point we have to truncate the process, otherwise it would render without stopping; this happens towards the end when we write lap.take(numFramesOut).
What happens between Sliding and OverlapAdd? First of all, the windows are multiplied by a window function that produces a fade-in and fade-out for each window:
val winAna      = GenWindow(winSize, shape = GenWindow.Hann)
val inW         = slidIn * winAna
...
val winSyn      = GenWindow(winSize, shape = GenWindow.Hann)
val outW        = slidOut * winSyn
We use the common Hann window which is also shown in the PaulStretch algorithm diagram.
The original Python implementation only applies this window in the analysis stage, whereas the synthesis tries to apply a “compensating” window based on the inverted overlapped Hann window; however, I believe this to be wrong because the phase randomisation in the Fourier domain essentially eliminates the analysis window shape.
Now to the transformation core:
val fftSize     = winSize.nextPowerOfTwo
val fft         = Real1FFT(inW, winSize, padding = fftSize - winSize)
val mag         = fft.complex.mag
val phase       = WhiteNoise(math.Pi)
val real        = mag * phase.cos
val imag        = mag * phase.sin
val rand        = real zip imag
val ifft        = Real1IFFT(rand, fftSize)
val slidOut     = ResizeWindow(ifft, fftSize, stop = winSize - fftSize)
The Fast Fourier Transform (FFT) works most efficiently when the window size is a power of two (2, 4, 8, 16, 32, 64, …), therefore we find val fftSize = winSize.nextPowerOfTwo—the next integer number equal to or greater than winSize which is a power of two. The FFT transforms a “time domain” signal into a “frequency domain” signal or vice versa. Often this is called forward transform (time to frequency) or inverse transform (frequency to time). Apart from floating-point number noise, a forward FFT followed by an inverse FFT reconstructs the original signal. In FScape, the forward transform is Real1FFT, and the inverse transform is Real1IFFT. “Real” means that the time domain signal is real as opposed to the frequency domain signal which is complex. The “1” in Real1FFT indicates that the transform is applied to a one-dimensional signal, such as sound. There is also a variant for two-dimensional signals which is useful for matrices and images.
Care must be taken in terms of the window sizes, since winSize is not the same as fftSize. In the forward transform, we reflect this with the padding parameter which means that for each chunk of input signal of length winSize, another fftSize - winSize zeroes are appended before taking the FFT, thus producing exactly chunks of length fftSize. In the inverse transform, we make sure to go back to the original winSize by subsequently resizing the windows coming out of the IFFT. ResizeWindow works by taking an input signal assumed to be chunked in fftSize windows, then for each window we adjust the window stop or end position by the delta winSize - fftSize, in other words shrinking the windows by dropping the last fftSize - winSize sample frames. We could have used ResizeWindow in a symmetrical fashion with the forward transform:
val inPad       = ResizeWindow(inW, winSize, stop = fftSize - winSize)
val fft         = Real1FFT(inPad, fftSize)
In the frequency domain, we want to preserve the magnitudes of the frequency bins, while replacing the phases with random values. Currently, FScape does not have a dedicated data type for complex signals, so it represents complex signals as ordinary sequences of floating-point numbers where real and imaginary parts of the complex numbers are interleaved. Always two subsequent “real” values thus represent actually one complex value. To help with this situation, we can activate pseudo complex number operations by writing .complex. In this case, .complex.mag takes the input signal, treats it as if it was complex, grouping always pairs of values as real/imaginary components, then calculating the magnitudes of these values (see polar complex plane if you need a refresher on the magnitudes and phases of complex numbers). In the same manner we could obtain the phase information as .complex.phase, but since we replace the original phases by random numbers, we do not need this information.
The easiest way to create pseudo-random numbers is to use the WhiteNoise generator. Its argument is the amplitude of the noise, producing thus random values between -amp and +amp. Phases in radians are periodic in 2π, so we use WhiteNoise(math.Pi) to produce random numbers between -π ≈ -3.14159 and +π ≈ +3.14159.
We convert back from polar coordinates (magnitude and phase) to cartesian coordinates (real and imaginary parts):
val real        = mag * phase.cos
val imag        = mag * phase.sin
And we re-interleave real and imaginary part through real zip imag, which produces a signal where values are alternatingly taken from the real and imag input signals.
Scala’s general syntax for calling methods is to use dot and parentheses—for example mag.*(phase.cos) or real.zip(imag). When a method has exactly one parameter, an alternative is infix syntax—for example mag * phase.cos or real zip imag. For binary mathematical operations, we normally use the infix syntax which feels more natural.
Adding a Widget Interface
All the effort of adding audio files and artifacts to the workspace must be good for something, or else we could just have hard-coded the input and output paths in the program. As stated before, the attribute map is Mellite’s way of allowing different objects to be interacting with each other. Now that we have the full stretching algorithm implemented, it would be nice if we could try it out on multiple different audio files. A much quicker way that adding each file to the workspace is to build a small user interface to select the files and then run the program.
A set of related object types exists for this: Control, Act, and Widget. They form programs in their own right, use the same language constructs, but are different in the results. A Control object is most similar again to a PD or Max patcher that consists only of messaging objects. There are values which are connected through a data-flow program, and there are actions issued through triggers such as Bang. While a Control program can exist over a period of time (it just “sits” there waiting for input and reacting), an Act—short for action—is an atomic operation, and becomes useful when glueing together different components. The Widget program finally is a variant of a Control program that also produces visual components which are rendered as a user interface. Thus, what we want to add here, is a Widget program that gives us visual components for specifying input and output audio files.
In order not to overload this tutorial, I am not going to explain in detail how the Control and Widget programs are written (this may become topic of another tutorial), but I will just present an example that can be coupled to the FScape program.
To create a Widget program, go to the workspace root window, press the plus button and select Organization → Widget. Alternatively and faster, create this object using the keyboard: ctrl-1 (Mac: cmd-1) brings up a text prompt. Enter widget and press enter.
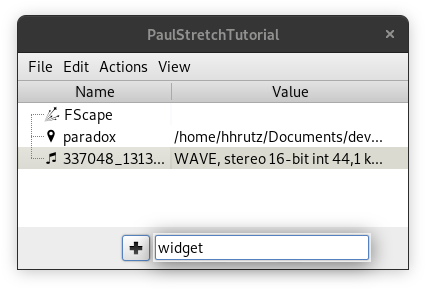
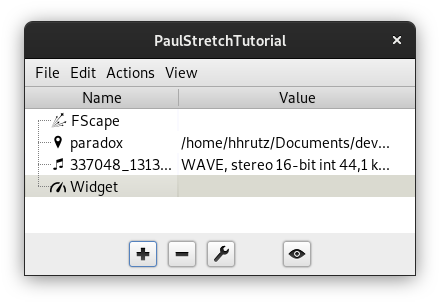
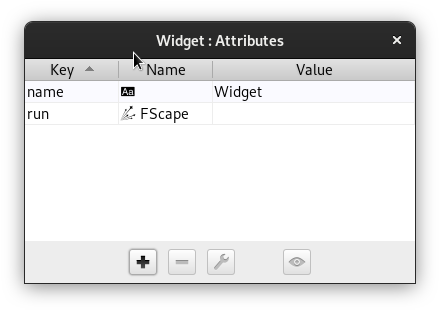
Since we want to control the FScape program with the Widget, we have to “link” them. Use the drag-and-drop operation as before, this time dragging the FScape program onto the attribute map of the Widget program—you open the latter by selecting the Widget object and click on the wrench-button or use the keyboard shortcut ctrl-; (Mac: cmd-;). When dropping the FScape program here, use run as the key name in the prompt. This is the key we will use in the Widget program.
Now we edit the Widget program. Like an FScape program, selecting the Widget object in the workspace root window and pressing the eye-button (or keyboard ctrl-enter, Mac: cmd-enter) opens the text editor, the initial program being empty. Paste the following code:
val r       = Runner("run")
val in      = AudioFileIn()
val out     = AudioFileOut()
val render  = Button(" Render ")
val cancel  = Button(" X ")

in .value <-> Artifact("run:in")
out.value <-> Artifact("run:out")

val running = r.state sig_== 3
render.clicked --> r.run
cancel.clicked --> r.stop
render.enabled = !running
cancel.enabled = running

val p = GridPanel(
  Label("Input:" ), in,
  Label("Output:"), out,
)
p.columns = 2
p.border  = Border.Empty(8)
p.hGap    = 8
p.compact = true

BorderPanel(
  north = p,
  south = FlowPanel(cancel, render),
)
The main take-away from this is that we can refer to another object using Runner(key). A runner is a control element that allows us to “run” the underlying element. Running an FScape program means to issue the render action. The other elements in the program are mainly Button widgets, text Label widgets, and for the audio file input and output we use AudioFileIn and AudioFileOut. The double-arrow operations <-> link the state of the widgets to the attribute map of the FScape object, and the right-pointing arrows --> link triggers to actions. The bottom part of the program consists in creating layout containers for the widgets.
When you Apply the program and switch to Interface tab, you see the user interface thus described:
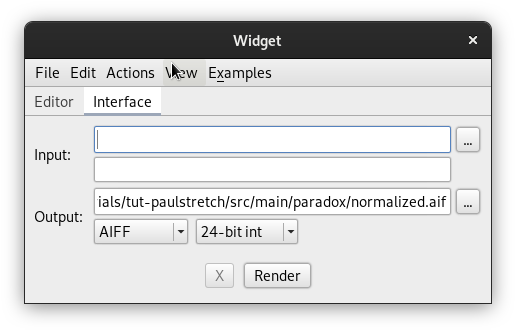
Click the ellipsis-buttons ... for Input and Output to select different audio files now, and click Render to create new paul-stretch renderings.
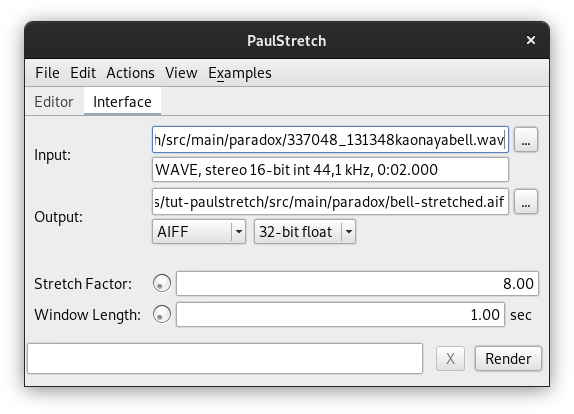
The final step is to polish the programs a bit. It would be nice if we could also set the window size and stretch factor in the user interface, as well as the audio file type for the output. Without further discussion, I will paste the final programs here. FScape:
val in          = AudioFileIn("in")
val winSizeSec  = "win-size-sec".attr(1.0)
val stretch     = "stretch"     .attr(8.0).max(1.0)
val fileType    = "out-type"    .attr(0)
val smpFmt      = "out-format"  .attr(2)

val N           = 4   // output window overlap
val sr          = in.sampleRate
val numFramesIn = in.numFrames
val winSize     = (winSizeSec * sr).roundTo(1).toInt.max(1)
val stepSizeOut = (winSize.toDouble / N).roundTo(1).toInt.max(1)
val stepSizeIn  = (winSize / (N * stretch)).roundTo(1).toInt.max(1)
val numStepsIn  = (numFramesIn.toDouble / stepSizeIn).ceil.toInt
val numFramesOut= (numStepsIn - 1).max(0) * stepSizeOut + winSize
val slidIn      = Sliding(in, size = winSize, step = stepSizeIn)
val winAna      = GenWindow(winSize, shape = GenWindow.Hann)
val inW         = slidIn * winAna
val fftSize     = winSize.nextPowerOfTwo
val fft         = Real1FFT(inW, winSize, padding = fftSize - winSize)
val mag         = fft.complex.mag
val phase       = WhiteNoise(math.Pi)
val real        = mag * phase.cos
val imag        = mag * phase.sin
val rand        = real zip imag
val ifft        = Real1IFFT(rand, fftSize)
val slidOut     = ResizeWindow(ifft, fftSize, stop = winSize - fftSize)
val winSyn      = GenWindow(winSize, shape = GenWindow.Hann)
val outW        = slidOut * winSyn
val lap         = OverlapAdd(outW, size = winSize, step = stepSizeOut)
val lapTrim     = lap.take(numFramesOut)
ProgressFrames(lapTrim, numFramesOut, "render")
val maxAmp      = RunningMax(Reduce.max(lapTrim.abs)).last
val gain        = 1.0 / maxAmp
val norm        = BufferDisk(lapTrim) * gain
val written     = AudioFileOut("out", norm,
  fileType = fileType, sampleFormat = smpFmt, sampleRate = sr)
ProgressFrames(written, numFramesOut, "write")
Widget:
val r       = Runner("run")
val in      = AudioFileIn()
val out     = AudioFileOut()
val render  = Button(" Render ")
val cancel  = Button(" X ")
cancel.tooltip = "Cancel Rendering"
val pb      = ProgressBar()

in .value         <-> Artifact("run:in")
out.value         <-> Artifact("run:out")
out.fileType      <-> "run:out-type"   .attr(0)
out.sampleFormat  <-> "run:out-format" .attr(2)

val stretch = DoubleField()
stretch.min = 1.0
stretch.max = 1.0e18
stretch.value <-> "run:stretch".attr(8.0)

val winSize = DoubleField()
winSize.unit= "sec"
winSize.min = 0.01
winSize.max = 100.0
winSize.value <-> "run:win-size-sec".attr(1.0)

val running = r.state sig_== 3
render.clicked --> r.run
cancel.clicked --> r.stop
render.enabled  = !running
cancel.enabled  = running
pb.value        = (r.progress * 100).toInt

val p = GridPanel(
  Label("Input:" ), in,
  Label("Output:"), out,
  Label(" "), Empty(),
  Label("Stretch Factor:" ), stretch,
  Label("Window Length:"  ), winSize,
)
p.columns = 2
p.border  = Border.Empty(8)
p.hGap    = 8
p.compact = true

BorderPanel(
  north = p,
  south = BorderPanel(
    center  = pb,
    east    = FlowPanel(cancel, render)
  )
)
Future versions will likely see a macro to set up the render/cancel/progress-bar part of the Widget program with less ceremony.
Download the Workspace
You can obtain a ready-to-use workspace containing the final versions of the programs, by downloading the PaulStretch.zip file from the Mellite downloads. After extracting the zip archive, use the menu item File → Open… from Mellite’s main window and select the PaulStretch.mllt directory in the chooser. If you have any problems, questions, or feedback, please use the Gitter channel.